


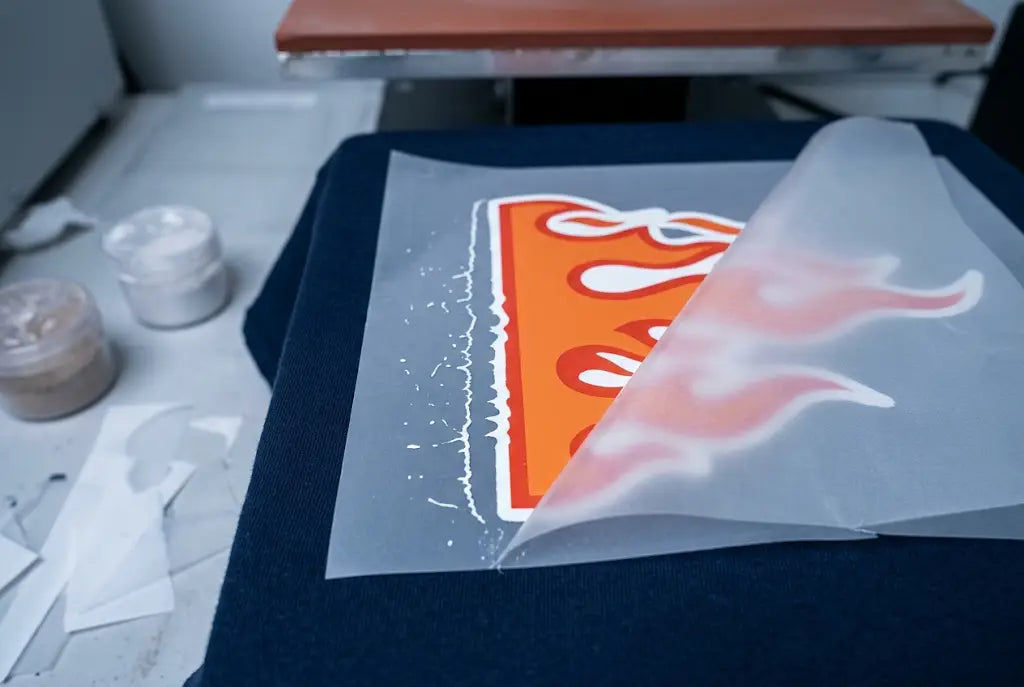
If you have ever pressed a DTF transfer and noticed a thin white line around your design, you are not alone. That faint outline is one of the most common issues in DTF printing, and it shows up most on dark shirts.
This post explains exactly what dtf white edges are, why they happen, and what you can do to prevent them. You will learn how the white ink layer works in Direct-to-Film printing, what causes a white outline on DTF transfer, and the simple file and printer adjustments that keep your prints clean. We will also cover common misconceptions about dtf white ink problems and share practical advice you can apply right away.
Whether you are printing your own gang sheets or ordering transfers from a supplier, this guide will help you get sharp, professional results every time.
What Are DTF White Edges?
There's an important distinction here. DTF white edges are not part of your design. They are the visible portion of the white ink underbase that extends beyond the colored image.
To understand this, it helps to know how DTF works. Direct-to-Film printing prints your artwork onto a special film. First, the printer lays down the color inks. Then it prints a white ink layer directly on top of the colors. That white layer is called the underbase. It gives the design opacity so it shows up on black or dark garments.
When everything is aligned, the white layer sits just inside the color layer and you never see it. When dtf white edges appear, the white layer is slightly larger than the color layer. After pressing, that extra white shows as a border or halo around the image.
- White edges on DTF transfers look like a crisp white outline.
- DTF white border is often most visible on black, navy, and dark heather shirts.
- DTF transfer white halo can appear on the entire design or only on one side.
The reality is, this is an alignment issue, not a fabric issue.
How DTF White Ink and Underbase Works
One of the most overlooked aspects is how the RIP software handles white. RIP stands for Raster Image Processor. It is the software that tells the printer where to place color and white ink.
In most workflows, the RIP is set to create a white underbase that is slightly smaller than the color layer. This is called choke. A small choke pulls the white ink inside the edge of the design so no white peeks out.
At the professional level, the white layer should be pulled in just enough to stay hidden. If the choke is set to zero or set to make the white larger, you will get a white outline on DTF transfer. If the choke is too aggressive, the edges of the design can look faded on dark shirts because there is no white support underneath.
- Color layer is printed first on the film.
- White layer is printed second, directly on top of color.
- Choke determines how much smaller the white layer is.
What matters most is that balance. Too much white shows. Too little white causes dull edges.
Why White Edges on DTF Transfers Happen
The underlying issue is rarely one single cause. In many cases, it is a combination of file quality and printer settings.
1. Artwork With a Soft or Noisy Edge
A common cause of dtf white edges is artwork that looks clean but has a faint transparent fringe. This often happens when a background is removed quickly in an editing app. The file appears to have a sharp edge at normal zoom, but at high zoom there are light gray or semi-transparent pixels around it. The RIP reads those pixels and adds white ink for them.
- Low-resolution PNGs saved from social media are frequent offenders.
- JPEG compression leaves a noisy edge that creates white.
- Logos without a clean vector cut tend to produce halos.
2. Incorrect DTF Underbase Settings
The critical factor is the underbase choke value in your RIP. If the white is set to be the same size as the color, or larger, it will show. This is the classic cause of dtf underbase problems.
- A choke set too low lets white extend past the color.
- A choke set the same for every design ignores that small text needs more choke than large solid shapes.
- White ink density set too high makes any small border look thicker.
3. Printer Alignment and White Ink Maintenance
A common misconception is that white edges are always a file problem. In this context, printer calibration matters just as much. If the print head alignment is slightly off, the color and white layers do not land directly on top of each other. The result is a white line on one side of the design.
Equally important is white ink circulation. White ink is heavier than color inks and settles if not agitated daily. When it settles, nozzles fire inconsistently, which can lead to dtf white ink issues like patchy opacity and rough edges.
4. Powder and Pressing Technique
From an operational perspective, hot-melt powder and pressing can make a small edge more visible. Too much powder spread beyond the ink area can melt into a visible ridge. Uneven pressure or a wrinkled shirt can also stretch the film slightly during pressing.
Ready to Print?
Your artwork deserves sharp colors, durable prints, and fast turnaround. Place your order today and get production moving.
[Order Your Prints - DTF Louisville]
Common Misconceptions About DTF White Ink Problems
There's an important distinction here between what looks like a white ink failure and what is actually an alignment failure.
Misconception: More white ink will fix the problem.
More white does not fix a halo. It makes the border thicker and stiffer. The fix is to make the white layer smaller, not stronger.
Misconception: White edges only happen on cheap film.
Film quality affects release, but even premium film will show dtf white border if the file has a soft edge or the choke is wrong. The practical implication is that you should check artwork before blaming supplies.
Misconception: White edges are normal on dark shirts.
A faint white line is common, but it is not acceptable for retail quality. With correct dtf underbase settings, the white should be invisible. This should not be overlooked if you are selling shirts.
The underlying reason these misconceptions persist is that the white layer is invisible on the film before pressing. You only see the issue after the transfer is on the shirt.
Key Considerations for Preventing White Borders
What matters most is a clean workflow from file to press.
- Start with clean artwork. Use true PNGs with transparent backgrounds or vector files for logos and text. Zoom to 300% and check the edge before you send it to print.
- Apply a slight inner choke in your design file. Pulling the edge in by 1 to 2 pixels in your editing software removes the soft fringe that causes dtf white ink problems.
- Adjust RIP choke by design type. For large solid graphics, a smaller pull-in is usually enough. For small text under a quarter inch tall or fine line art, a larger pull-in keeps edges clean.
- Maintain your printer. Run a head alignment check each week and circulate white ink daily. This prevents dtf underbase problems that appear as one-sided halos.
- Control powder application. Apply an even, light coat of powder and shake off excess. Cure until the powder melts smooth, not grainy.
This tends to produce a much sharper final print.
How to Fix DTF Underbase Problems in Your Workflow
Beyond that, it helps to have a simple test routine.
- The distinction lies in testing on dark fabric first. Since dtf white border is most visible on black, press your test prints on black. Print the same design with two or three different choke values on one small sheet. Press them side by side and compare.
- From there, you can lock in a standard setting for your shop. For example, many shops use a moderate choke for most graphics and a larger choke for small text. This avoids adjusting for every single order.
- At the same time, avoid over-correcting. If you pull the white in too far, you create a different issue where the dark shirt shows through at the very edge of the color, making the design look faded. The broader point is balance.
- If you order transfers instead of printing in-house, ask how the supplier handles white. At DTF Louisville, every file is checked for soft edges and choke is set based on artwork type before printing, which helps prevent white edges on DTF transfers before they reach your press.
Preventing White Outline on DTF Transfer With DTF Louisville Quality Checks
There's an important distinction here between printing and pre-flight. A good supplier does not just print what you send.
At DTF Louisville, the process includes checking for transparent fringe, flagging low-resolution files, and applying artwork-specific dtf underbase settings. This is particularly relevant when you have mixed gang sheets with both large graphics and small text. Each design type needs a different approach to stay halo-free.
This practical step saves reprints and keeps your production moving.
Conclusion
Ultimately, dtf white edges come down to one simple idea. The white ink layer is showing because it is larger than the color layer above it. This can be caused by artwork with a soft edge, incorrect underbase choke in the RIP, slight printer misalignment, or heavy powder application.
In the long term, the fix is straightforward. Start with clean, high-resolution artwork, use a slight choke so the white sits inside the color, maintain your printer's alignment and white ink circulation, and finish with even pressure and a smooth peel.
From a practical perspective, taking a few minutes to test on a dark shirt and adjust choke values prevents most issues. The central consideration is not to add more white, but to control where the white sits.
With clean files and correct settings, you can eliminate the halo and get a sharp, professional transfer that looks printed into the shirt. DTF Louisville is here to help you get that clean result on every order, with files checked and underbase set for dark garment printing.
Ready to Print without white edges?
[ Start Your Order ]
Frequently Asked Questions
What Are DTF White Edges?
DTF white edges are the thin white outline visible around a design after pressing. They occur when the white ink underbase, which provides opacity on dark shirts, extends beyond the color layer. This happens due to soft artwork edges, incorrect underbase choke in RIP software, or slight printer misalignment.
Why Do I Get White Edges on DTF Transfers Only on Black Shirts?
White edges on DTF transfers show most on black shirts because the contrast is highest. The white underbase is designed to be hidden under color. On light shirts, a small extra white is less noticeable. On dark shirts, even a tiny extension of white beyond the color creates a bright halo.
How Do DTF White Ink Problems Cause White Outlines?
DTF white ink problems cause outlines when white ink is not precisely aligned inside the color. If the RIP is set with too little choke, or if the file has semi-transparent edge pixels, the printer adds white where it shouldn't. This creates a white outline on DTF transfer after pressing.
What Is DTF White Border and Is It Normal?
DTF white border is another name for the white halo around a print. It is common but not considered normal for retail quality. It indicates the white underbase is larger than the artwork. With correct file prep and underbase settings, the border should be invisible on the finished garment.
How Do DTF Underbase Problems Affect Print Quality?
DTF underbase problems affect both appearance and feel. When the white extends past the color, you see a white edge. When it is pulled in too far, the edge of the design can look faded on dark shirts. Proper choke balances opacity with a clean edge and softer hand feel.
What Are the Best DTF Underbase Settings to Avoid Halos?
The best DTF underbase settings pull the white layer slightly inside the color layer. Most shops use a small choke for large graphics and a slightly larger choke for small text. Testing on a dark shirt with different choke values helps find the cleanest result without causing dull edges.
Why Does My DTF Transfer White Halo Appear Only on One Side?
A DTF transfer white halo on one side usually points to printer head alignment being off. When the head prints in both directions, a slight misalignment makes color and white layers shift. This creates white on one side of the design. Running a bidirectional alignment calibration usually fixes it.
Can Artwork Quality Cause White Outline on DTF Transfer?
Yes. Artwork quality is a leading cause of white outline on DTF transfer. PNGs with leftover background fringe, JPEGs with compression noise, or low-resolution images cause the RIP to generate white ink outside the intended edge. Cleaning the file and adding a slight inner choke prevents this.
Do You Check for DTF White Ink Issues at DTF Louisville?
Yes. At DTF Louisville, we pre-flight every order for potential DTF white ink issues. We check for soft edges, low resolution, and incorrect transparency, and we adjust underbase choke based on design type. This helps deliver clean transfers without white edges, especially for dark garments.
How Can DTF Louisville Help Prevent DTF White Edges on My Orders?
DTF Louisville helps prevent DTF white edges by reviewing files before printing, applying artwork-specific choke settings, maintaining calibrated printers, and using even powder application. Our quality check reduces halos on dark shirts, so you get sharp transfers that press clean and look professional from the first shirt to the last.
Share:
5 DTF Gang Sheet Builder Hacks to Cut Your Ordering Time in Half